Jun 062007
 

strawberry-short-cake.jpg

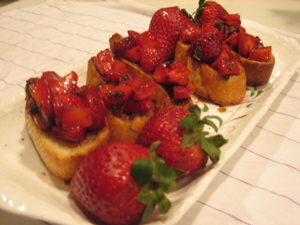
Now the last strawberry recipe Strawberry Bruschetta was a little different so here is more
of a classic, Strawberry Shortcake. These shortcakes are great because they
also could be served as a breakfast biscuit with jam and butter!
This is a simple recipe for making an individual dessert.

Shortcake
1/2 Cup of Sugar
2 Cups of Flour
2 Teaspoons of Baking Powder
1/2 Cup of Butter
1 Egg (beaten)
2/3 Cup of Buttermilk (a little extra to brush tops of Shortcakes)
1 Teaspoon of Vanilla

Preheat Oven 450

In a mixing bowl with your hands mix together butter, sugar, flour and baking soda- until butter is evenly blended in. Then add remaining ingredients and mix until well combined and can form a ball. Pat out the dough (about 1-1.25 inches thick) on a floured surface and with a 2.5 inch circular cookie cutter cut shortcakes and place on baking sheet. Brush the top of each shortcake with Buttermilk. Bake for 15-18 minutes until golden brown on top. Makes about 12 shortcakes

Strawberries
4 Cups of quartered Strawberries
1/4 Cup of Sugar
1 1/2 Cups of Whipped Cream

Mix Sugar and Strawberries- let stand for at least 1/2 hour to release the juices from the strawberries.

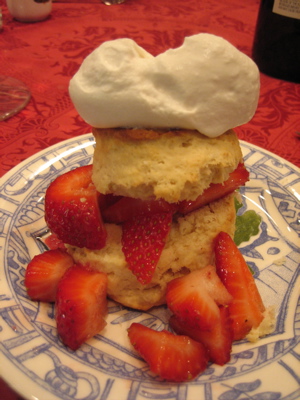
Assemble the Strawberry Shortcakes
Cut the shortcakes in half (width wise) on bottom half place a 1/3 cup of strawberries top with the other half of the shortcake and finish off with a dollop of whipped cream!

 Posted by at 7:20 pm
May 302007
 

strawberry-bruschette.jpg

In California the strawberry season is going strong and the season has just begun back here. Growing up in Southern California one of my favorites memories was during strawberry season going to the local stands on the side of the road and picking up flats of strawberries. There are a million and one fabulous recipes with strawberries. One that I just had last night a Strawberry Mojito. This recipe is similar to the Strawberry Mojito in that it is combining Mint with Strawberries. This is a great refreshing light dessert for the summer or easily could be served as a hors d’oeuvres.

2 Cups of cut Strawberries
1.5 Tablespoons of Balsamic Vinegar
1-2 Tablespoons of sugar- (if really fresh will need less sugar)
2 tablespoons of Chopped Mint
Spread
3 tablespoons of softened unsalted Butter
2 teaspoons of Cinnamon Sugar
12 slices of either a Baguette or Brioche (1/2 inch thick)

Preheat oven 350
In a bowl mix together strawberries, vinegar, sugar, and mint. Let sit
for at least a half an hour before assembling. In a separate bowl mix
together butter and cinnamon sugar and let stand preferably for at
least a day but if time does not permit, no worries. Spread each piece of
bread with cinnamon butter and bake for 15 minutes. Let stand for a few
minutes Top each piece of bread with strawberries and ready to serve.

 Posted by at 7:13 pm
May 212007
 

asparagus.jpg
Asparagus can be found year round, but the height of the season is March through June. There are numerous ways in which you can prepare this vegetable, but this is my favorite. When picking asparagus try to avoid the ones whose stalks are white. (This does not apply to white and purple asparagus.) Two other little facts. Asparagus is part of the Lily family and can be mircrowaved.

Pre Heat Oven 375

1 bunch of Asparagus
2-3 Tablespoons of Olive Oil
2 Tablespoons of grated Parmesan Cheese
Salt and Pepper

On a baking sheet place Asparagus and drizzle the olive oil evenly over stalks. Followed by sprinkling the Parmesan Cheese and salt and Pepper. Bake for about 10-12 minutes. Watch them while baking because you do not want them to over cook they should be tender not mushy.

 Posted by at 5:56 pm
May 132007
 

tulips.jpg

Today is Mother’s Day one of the most popular times of year to buy flowers. Tulip season, is also underway. So here is a helpful tip for keeping your tulips looking fresh. If they start to fall over add a little bit of vodka to water and they will perk back up. Thank you Christina for this tip.
Happy Mother’s Day to all Mothers and to mine- I love you!

 Posted by at 7:17 pm
May 042007
 

mint-julep.jpg
Needless to say every year Cinco De Mayo falls on the same day but this
year May 5th is also the Kentucky Derby. I am a strong believer that when is a Margarita not a good time? They are guaranteed fun. My feelings are not as strong towards the Mint Julep, until recently. I am not a big fan of Bourbon. Although, upon doing some research for the Mint Juleps and how to make a great one- my feelings have changed.

What I learned. It is ALL about the ICE and how the bourbon is poured. To make the perfect Mint Julep

1/3 Cup of Mint
1-2 Tablespoons of Simple Syrup
3 ounces of Bourbon
2 Cups of Crushed/Shaved Ice

In the base of a cup preferably a metal cup muddle the mint with the simple syrup. (It was explained to me the best way is to make a mint infused Simple Syrup which can be made with the same simple syrup recipe by adding a bunch of Mint once the sugar has dissolved let simmer for 5 minutes and then let stand for 15-20 minutes and then strain mint from syrup and refrigerate.) Now, the tedious part, the ice needs to be crushed or shaved and add a little ice, then a little bourbon and continue this process all the way to the top of the. About 3 to 4 times and finish off with a sprif of mint and straw. The straw allows you to taste all the different flavors from the top the bottom.
It is ideally served in a metal cup

 Posted by at 7:33 am
Apr 262007
 

small-kitchens.jpg
I live in 350 square feet. My kitchen is about 40 square feet I don’t have a full size oven, two burners don’t work, and I have 18 inches of counter space. But none of this stops me from making just about anything and for any amount.
Recently, I was adding pantry treats to goodie bag for the Children for Children Benefit in NYC at Christies. There were 700 bags and 2800 individual items that needed to be wrapped. Before I go any further I must thank those that came and gave a helping hand. I will always remember it; I could have never done it with out your help.  (I had no idea just how many 700 were, but now I do!) THANK YOU to my Mom, my sister Carolyn, her fiancé Evan, Ariana, Chris, Courtney, Emily, Margaret,  Marybeth, and Natalie.
All of this baking took place in my little apartment. Each bag was filled with chocolate honey comb, a brownie, a cookie, and a peanut butter cup. Of course I had to transfer items around the neighborhood to friends apartments for frig and freezer storage. (unfortunately my photos of this were all corrupted too much for my camera to handle.) How do I do this in this small of a space? I have a couple of tools that help me a lot and do not take up that much storage space. I have them stored standing up under my sink.
 
1. Large Cutting Boards (I have two)
2. Jelly Roll Baking Sheet (I had two but for this had to buy two more!) This is basically a cookie sheet with inches sides all the way around.
 
The Cutting Boards, I most often will place over my sink to act as another work surface. Transfer it to a table in my “multi purpose room” and use the next cutting board in the same manner. I store things on the baking sheets when done and they fit nicely in my refrigerator. Now there are stores like Tiny Living that specialize in mini item. I don’t like using mini things- I just forego certain tools that take up a lot of space like a Kitchen Aide Mixer and a Cruisanart. I dream of one day of being able to have space for them. But until then I will have to make do with my hand mixer and blender!

 Posted by at 6:30 pm
Apr 172007
 

granola_bar_cranberry.jpg
These are great for both the novice and the experienced cook as they aren’t very complicated and are often a forgotten recipe. I know, for me, they were something I was interested in trying but never had until recently. The best part is you can make them however you want and can decide on your own toppings! This would be a great rainy day project with a child.

5 Cups of Granola
1 Cup of Light Brown Sugar
1 Cup of Honey
2 Teaspoons of Vanilla
1 Cup of White Chocolate Bits
1 Cup of Dried Cranberries

Preheat Oven 400 Degrees

In a large bowl mix all of the ingredients together and spread evenly in a greased 9×13 inch baking pan. Bake for 30 minutes
Patience is a virtue I do not have when it comes to wanting to try things directly out of the oven. But with these, you have to let it cool or there is no way you will be able to cut them in to bars.

 Posted by at 7:15 pm
Apr 112007
 

flower_arrangement_roses.jpg

Spring time is here or should I say the calendar indicates that it’s Spring! One thing I love about Spring is flowers; ever since I was a little girl flowers have always been my favorite thing. They just make me happy. Flowers are one of the most common hostess gifts given and for a good reason. The price points range, enabling anyone to purchase, and above all else, who does not like to receive them? But how about taking it one step further?

My mother’s favorite hostess gifts to both give and receive are flowers. But she says the nicest thing is to receive them a day before or morning of an event. This way everyone can enjoy them and if she is having a dinner party, she won’t be arranging the flowers while getting the roast out of the oven. My sister’s fiancé did this on his first trip out West to visit my parents- I heard about the orchid for the next week and how thoughtful and wonderful he is. (The extra effort went a very long way)

Sure there is always 1-800 Flowers, but there are many other routes to go- find a hotel you might like, based on aesthetics, in the area and see who they use or recommend. Also you can call/ visit the website of Bbrooks Fine Flowers which has a partnership with all the leading florists in the nation. This way you can locate the best in the area. Hopefully, this is just helpful information since there are always occassions when flowers are the perfect gift.

 Posted by at 6:02 pm
Apr 022007
 

zucchini-baked-eggs.jpg

Recently, I got together with a group of old friends for brunch. One of my favorite passtimes is a healthy combination of eating and being with friends. I love going to others’ homes and watching them entertain. I always see it as a great learning experience with different ideas to pick up. I have never seen eggs prepared this way very. The best part is that they’re healthy and absolutely delicious! Thank you Sarah.

4 Pounds of Zucchini
4 Shallots Chopped (about 1/2 Cup)
2 Tablespoons of Butter
2 Tablespoons of Olive Oil
6 Eggs
salt and pepper
Preheat Oven 350

Wash the zucchini and grate it all. In a large bowl toss with a little bit of salt about 2 teaspoons to help remove the moisture from the zucchini, let sit for about 5 minutes and drain water and pat dry. In a frying pan heat olive oil and butter and cook the shallots for about 2-3 minutes and then add zucchini and saute for about 5-8 minutes.
Use either a larger casserole dish about ten inches in diameter or six smaller casserole dishes. Push zucchini mixture into dish and dig out six holes. Crack one egg into each hole (salt and pepper) and bake for about 20 minutes. I think this was great on its own but they were also served with a Hollandaise sauce.

 Posted by at 6:01 pm
Mar 262007
 

lightening-mcqeen.jpg
Remember your birthdays growing up? They were always a HUGE deal. Well, at least they were for me! This past weekend a little friend of mine was turning three and he loves the Disney Pixar movie- Cars. I was asked to make the cake for his big day with this theme in mind. I was a little nervous for two reasons: I was not sure if this cake was going to remotely resemble Lightening McQueen AND turning three is monumental at that age. In the end, after several hours of preparation, I have to say I was so excited about the final result! The best part is that this movie, like most Pixar films, is that it is for of all ages; it has become one of my sister’s new favorites- so she might be getting this cake for her 29th birthday.

Chocolate Cake
3/4 Cup of Unsweetened Cocoa Powder
1 1/2 Cups of Buttermilk
1 Teaspoon of Vanilla
1 3/4 Cup of Flour
2 Cups of Sugar
3 Eggs
2 Sticks of Of Softened Butter
1/4 Teaspoon of Salt
1 Teaspoon of Baking Soda
1 Teaspoon of Baking Powder
Preheat Oven 350

In a mixing bowl mix together sugar, butter until well combined, then beat in vanilla and eggs one at a time. Once well combined stir in buttermilk. In a separate bowl combine flour, cocoa, baking soda, baking powder and salt. One cup at a time add flour mixture to sugar mixture until well combined. In this case I greased the Lightening McQueen Cake tin or the other option would be to grease 2- eight inch round cake pans. Bake for 35 minutes until a knife comes out clean. Let cool before flipping over to release the cake. This cake was decorated with a buttercream icing- more than anything it just took time and patience.

I also made Cup Cakes and put race flags in each of them to go along with the Cars Theme.
box-of-cupcakes.jpgracing-cupcake.jpg

The favors were a little Lightening McQueen Car with candy wrapped in Cellophane paper and tied with a black and white checkers.
cellophane-racing-bag.jpg

 Posted by at 7:56 pm