Nov 232010
 

Safety First!

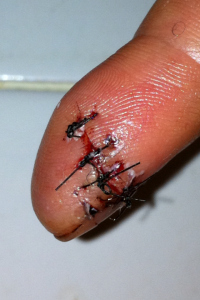
photo (1)

This past weekend, a friend of mine learned the horrible lesson, even if an appliances is off it needs to be unplugged. She was making a ricotta spread and got a clump stuck in the blade.  While getting something out of the blade of the Emulsion Blender, the blade activated.  This lead to the two of us spending the evening at the ER instead of indulging in the ricotta spread. Luckily, only five stitches were needed!

Just a reminder to always unplug electronics, especially when there are blades involved!

 Posted by at 10:35 pm
Oct 132010
 

I recently went to a cocktail party where the hostess had served roasted figs in balsamic vinegar and honey. They were delicious.  The presentation looked so warm and welcoming. She paired it with roasted almonds and blue cheese with slices of bread. The flavors were amazing. This was something that was a simple to prepare and wonderful to serve to a large or small group as the weather is starting to turn colder.

Figs 1

Figs 2

1o Figs – cut in half and take the stems off

6 Tablespoons of Balsamic  Vinegar

2 Tablespoons of Honey

2 Tablespoons of Sugar

1 Teaspoon of Cinnamon

2 Teaspoons Olive Oil

Pre Heat Oven at 350

On a jelly role sheet (a cookie sheet with sides) or baking dish place cut figs. In a saucepan heat 3 tablespoons of Vinegar, Honey, Sugar Cinnamon, and Olive Oil and cook until simmering. Evenly cover the figs with the sauce and place in oven for 30 minutes then take out every 10 minutes and brush with vinegar. Take out when figs are nice and tender! Ready to serve.

Things that are paired well with Figs: Almonds, Anise, Blue Cheese, Chocolate, Cinnamon, Goat’s Cheese, Hard Cheese, Hazelnut, Mint, Orange, Prosciutto, Raspberry, Soft Cheese, Vanilla, and Walnut.

 Posted by at 9:02 pm
Sep 202010
 

I am back!! Over the past months, I have thought a lot about my blog but, to be honest, lacked the inspiration/hope,  felt that there were just so many blogs out there, and that cooking was some fad. But, I realize I have always been happiest in the kitchen, whether cooking for myself or for people I love.  My personality has always been an open book, so I will continue to share my thoughts and what I find interesting with anyone who is interested in reading.

What have I been up too? Outside of my cooking, I have been working on mastering knitting, becoming more comfortable with my sewing machine, and trying to finish the needlepoint I started making for my sister’s wedding three years ago. (I thought I should finish it before her baby comes in January!!)Chicken Payard

Along with many hours spent in the friendly skies.  In the kitchen, I have been interested in flavor pairings and pasta. I love pasta and restaurants make it look so easy, so I thought it would be fun to start making my own pastas and working on sauces. And I was correct — I have had a lot of fun working on my pasta! What fun it would be to do a course on Pastas and Gelatos in Italy….Oh, how a girl can dream!

As some know, I have a tendency to be a little over the top. When I entertain, I make three sauces instead of one. I just get so excited to cook for others that I get carried away. But then there are times when I keep it simple, and am so delighted by the result. Chicken Paillard is one of my favorite dishes to order. It is clean and simple, with so many simple variations. Recently, I made it and served it with: Slow roasted Tomatoes, (or speed the roasting and just increase the temperature) Roasted Fingerling Potatoes, Mixed Greens with a Lemon Vinaigrette, and a Lemon Wedge. Everything, except searing the chicken, could be done in advance and served at room temperature.

To make the Chicken Paillard

Take a boneless skinless chicken breast and pound it out until it is about 1/3 inch thick, salt and pepper both sides. This can be done  earlier covered and place in fridge. Heat frying pan with a little bit of vegetable oil and cook chicken both sides about 1-2 minutes on each side. Now it is ready to be served. Perfectly simple and something that everyone will enjoy! This dinner was finished with chocolate sundaes. To make them a little more exciting,  I went to a local ice cream store where they make fresh waffle cones and bought four waffle cups!

Mar 022010
 

I’m not done!

I received an email a few weeks ago from a reader who wanted to vent and thought this blog would be a good place to express his frustration. I was happy to receive his email and upon reading his email, I could not agree more with his annoyance.

He was frustrated that when he goes out to dinner his plate is cleared while other people at the table are still eating. That in fact it is quite rude to clear a plate while others are still eating.  It makes for an awkward eating environment, forcing people to think they either ate to fast, or ate too slow, and should be rushed. My other personnel frustration is when a plate is taken away from you and you haven’t finished eating!  I thought, I would write about it more for food for thought and then look at how to let people know you are in fact finished. Also different cultures have different ways of letting you know when they are done.  Please let me know of any other specific cultural tradition and if you have a frustration like this to vent. I would love to hear.

I know there are many times, I take a break while I am eating. Please see the illustration below showing how your fork and knife should be place to indicate that you are not done yet. Knife and fork are criss-crossed at 8 and 4 if your plate is a clock face.

  plate1


Okay now I am done. Knife should be placed turned inward and the fork is resting next to it. Using the analogy of the plate being the face of a clock, knife and fork are resting at 5 in the direction of 11. In British culture the fork is face up.

plate2Â

Â

Most importantly plates should not be cleared until everyone has finished.

Asian Cultures

When eating food served in bowl with a lid, replace the lid on the bowl when you have finished.

When you have finished your meal, place your chopsticks on the chopstick rest when provided as they were when you started. If there is no rest make one with the chopstick wrapper.

Illustration Credit: Ask and about Clothes

Feb 122010
 

Sugar Cookies

Here is a great classic recipe for a simple rolled cookie. Yes, any cut out cookie does take a little bit more work than a drop cookie. One way I cut a corner with these cookies is that instead of frosting them, I just dipped them half in chocolate. I found this fabulous sparkle plate at TARGET. I was so excited I bought 8.

Preheat Oven to 375

1/3 Cup of Butter

1/3 Cup of Shortening/Crisco

¾ Cup of Sugar

2 Teaspoons of Vanilla

1 Egg

4 Teaspoons of Milk

2 Cups of Flour

2 Teaspoons of Baking Powered

In a mixing bowl, beat together the butter, Crisco, sugar, and vanilla. Flowed by adding the egg and whipping until light and fluffy. Mix in the milk and then stir in the flour and baking powder.  Divide batter into three equal parts and wrap in plastic wrap and refrigerate for at least one hour.

On a floured Surface roll out one of the parts of dough to about 1/8th inch. With a cookie cutter cut the dough with the cutter and place on baking sheet. Bake for 6 minutes.

You can eat them as is, sprinkle with sprinkles before baking, ice after being cooled or dip them in melted chocolate as I did.

Feb 032010
 

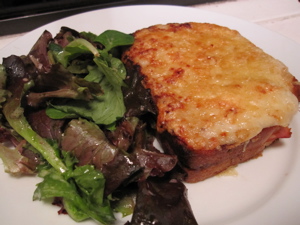
Crouque

I can remember the first time I had a Croque Monsieur vividly. I was 8 years old, had just moved to Tokyo with my family, and come back from school orientation and while waiting for my mother in lobby seating area my father ordered one for us. He was so excited to see it on the menu. I think to this day it is still the best croque monsieur; I have ever had. Recently, in the past year I have been on the quest to find one that compares. I have found one that competes but thought I would indulge and try it on my own.  I have seen them cut up small and served as hors d’ oeuvres. Which I think is an awesome idea.

What makes this different from just a ham and cheese sandwich? The Bechamel Sauce.  I never would have thought to put a sauce in a sandwich, but oh how it makes it delicious!

Pre Heat 350 degrees

Croque Monsieur

4 slices of Sandwich Bread

4 ounces of Slice Ham

1 1/4 Cup of Grated Gruyere Cheese

1/4 Cup of Grated Parmesan Cheese

2 Tablespoons of Butter

1 Tablespoon of Dijon Mustard (optional)

5 to 6 Tablespoons of Bechamel Sauce (See Below)

Lightly and evenly butter on both sides of bread and toast both sides in saute pan over low heat until just golden brown. If you decide to use Dijon Mustard spread one side of each toasted slice with mustard. Evenly place the ham slices and about ½ cup Gruyere cheese on two of the bread slices. Top each with one of remaining bread slices, mustard-side down. Spread bechamel sauce to cover the top of each sandwich including the crust. Sprinkle evenly with the remaining Gruyere cheese and Parmesan Cheese. Place on a pan and bake for  5 minutes, then place under broiler until cheese is bubbling and lightly browned, about 3 minutes.

Bechamel Sauce

1 tablespoons butter

1 tablespoons flour

½ cups warmed milk a plus 1 Tablespoon

Salt and ground pepper to taste

1/4 Cup of Grated Gruyere Cheese

Melt the butter in a saucepan. Stir in the flour and cook, stirring constantly, until the paste cooks and bubbles a bit, about 2 minutes, do not let it turn brown. Add the hot milk, continue to stir, the sauce will thicken and bring to a boil. Add salt and pepper, lower the heat, and cook, stirring for 2 to 3 minutes more. Remove from the heat and stir in the Gruyere Cheese.

Jan 212010
 

Beef B

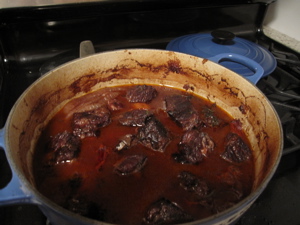
Julia Child’s Beef/Boeuf  Bourguignon

I saw Julie and Julia the first day it came out. I don’t think, I was the only person that was then intrigued to make Beef Bourguignon and see what all the fuss is about. I made this recently, on a cold snowy night. This is the perfect dish for this kind of evening. While making it I did not understand why there was all this fear in making the Beef Bourguignon. I think the fear comes from the fact that there are multiple steps and it takes a long time to cook. Also you do need a Dutch Oven to make this dish. Since it was the holiday season, I saw it as an excuse for me to finally buy one. This is something that could be made the day before and I think,  actually tastes better the next day. Also a perfect dish to entertain with in the winter since it can be made ahead. It is very hardy.

6 oz Bacon (cut into pieces ¼ inch thick and 1½ inches long)

1 Tablespoon of Olive Oil

3 lbs of Lean Stewing Beef (cut into 2 inch cubes and pat dry)

Slice Carrot  I used 4 carrots and would suggest maybe 6

1 sliced Onion

1 Teaspoon of Salt

¼ Teaspoon of Pepper

2 Tablespoons of Flour- I used 3 to 4 tablespoons

3 Cups of Full-bodied Red Wine

2 to 3 Cups of Beef Stock

1 Tablespoon of Tomato Paste

2 gloves of Mashed Garlic

½ Teaspoon of Thyme

A Crumbled Bay Leaf


24 Small White onions

1 lb of Fresh Mushrooms


Preheat Oven 450 Degrees


Simmer bacon for 10 minutes, and then drain water and pat try. In Dutch Oven/Casserole Fireproof Dish saute the bacon and olive oil for 3 minutes. Remove bacon and set aside. Heat oil and saute beef until browned, do this a few pieces at a time and when browned on all sides with bacon. In the same fat brown all of the vegetables (except small white onions and mushrooms). Once vegetables are lightly browned, pour out the sauteing fat. Return the beef and bacon to Dutch oven and toss with salt, pepper, and flour and place in oven for 4 minutes. Remove from oven and toss again and return to oven for 4 minutes. (This browns the flour and covers the meat with a light crust).

Reduce Oven heat to 325

Stir in the wine and enough stock so that the meat is barely covered. Add the tomato paste, garlic, and herbs. Bring to a simmer on the stove. Then cover the dish and place in oven for 2.5 to 3 hours. The meat is done when a fork pierces it easily.

Boil the Small White Onions and then remove skins after cooked from onions. Cut Mushrooms into quarters and saute.

When ready to serve distribute the onions and mushrooms over the meat.

Jan 122010
 

Happy New Year! I know this past year I did not update as much as I would have liked. I am finally getting my home together again. I seem to be bed bug free and now have a working refrigerator 1) that works and 2) that is not filled with trash bags filled with clothing. Most importantly, I have started the transformation of turning my apartment; into my own little craft studio. I am tickled pink about this transformation. It is now only being referred to as the Studio

So, I have decided I am going to start the year off with something that reminds me of lunches with my mom. When I was in pre-school waiting for my sisters to be done with school, we always have lunch together and most times there was a popover with strawberry butter involved. My sister over thanksgiving served popovers, strawberry butter, and salad for her first course and it reminded me of how much I enjoy them. The batter can be made in advance and these are perfectly simple to make, a little different than just serving a roll. Also, a popover pan could totally make a fun gift! I know, I love all of my random cooking utensils.


1 Cup of Flour

1 Cup of Milk

3 Eggs

2 Tablespoons of Melted Butter (a little extra butter to grease the pan)

Pinch or two of Salt

Preheat oven 425 degrees


In a blender mix all ingredients together until smooth. Grease the popover pan and preheat the pan in the oven for about 3-5 minutes. Take out and fill each popover cup until ¾ full of batter and bake for 25 minutes. Makes 6 popovers. I think best served with Strawberry butter or some other flavored butter.

Nov 032009
 

I realize I usually write about cooking, entertaining, tips, and ideas, but I think this is still somewhat relevant as it has affected my home.

Some friends said don’t write about it, because there still is, that stigma attached to having bed bugs. But I say, I would rather have everyone know and become a little more educated and know that it easily could happened to you. Although, I will say, I hope it never does. Even if you live in a nice area are super clean and have no clutter don’t be fooled and think you are safe from it. Bed Bugs are an epidemic that has hit New York City like wildfire over the past two years and is up 47% since last year. Only 1/3 of people react to the bites, lucky for me I have a severe allergic reaction to them!  They are very hard to find. They can hide in walls, move through pipes, live in almost anything. They bite until the hit a capillary, and they don’t need to feed every night. I have had a lot of conflicting information on the life span but most say it is 400 days and a female bug can lay 5 eggs a day. You can’t just bomb your apartment, everything needs to be packed up.  And you can’t just move, you have to make sure the problem is cleaned up where you currently live or you will just bring it with you to your next home.

For the past three weeks, I have been living a nightmare. One that cannot be completely explained but anyone who has gone through it would know just how horrible it is. I am living out of trash bags, putting my clothing in the refrigerator because I am paranoid, am on antibiotics, have had to stay in hotels, sore from all of my bites, and had many sleepless nights with fear of being eaten/bitten. Now, I always try and look at the glass as half full and there have been some positives, I have cleaned out my apartment, will have super clean clothing, I am turning my apartment into a craft studio. Before I detail the situation I am very grateful to those who have been supportive to me throughout this ordeal. Thank you.
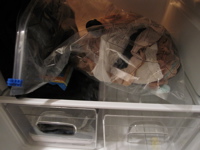
Clothing in Fridge

Day 1- I noticed I was bitten and thought it must have been some random mosquito

Day 2- I was bitten again and realized it was too cold for mosquitoes

Day 3- Marked my body with permanent marker to track if I was getting new bites

Day 4- Went to a dermatologist to have a doctor examine my bites- ruled out all other kinds of bug and spider bites, 95% sure I have bed bugs. I decide to grab dinner by myself to try and decompress.

Day 5- Get a new bite and realize this must be bed bugs and call my management company. That day Roberta my “fairy god mother to bed bugs” came to my apartment to inspect. Could not find anything but my bites were classic bed bug bites and recommended that I have a trained beagle come into my apartment. Spent the evening washing and bagging clothing in a laundry mat. I decide I would not stay in my apartment anymore until the situation was resolved.

Day 10-  The first appointment available appointment for the trained beagle to sniff the apartment. Roscoe barked and pointed his nose in three spots in my apartment: the bed, sofa, and hamper. Now, I wanted not to believe this little beagle but he is 98% accurate and I had bites to prove it. It was just  frustrating because no one thus far was able to find one of these little bugs that was tormenting me.  I spent the rest of the day starting the cleaning and packing process. Now I have been in this apartment for five years and every article of clothing needed to be washed or dry cleaned, every book vacuumed and all packed up into trash bags and knotted. I was working until 3 am since I had little time and they were coming to fumigate my apartment in less than 48 hours. By the time I went to bed, all I had left was a t-shirt and it was cold. I had no more blankets or pillows. I sprayed myself with rubbing alcohol (supposedly they don’t like the scent) and got into a trash bag myself to prevent being bitten and to try and stay warm. Yes, a hotel might have been a better option but I was trying to process so much that nothing made sense to me and the costs of everything just seemed overwhelming to me.

Day 11- Went to work and spent the evening packing and cleaning. I did go to a hotel that night arrived with my infamous trash bags at midnight.

Bathroom Bugs

Day 12- I received no wake-up call, so was a little frantic as I was now running an hour behind. Like all moves you think you have made so much progress and don’t have that much to do but then there is always so much more. They arrived at 2 pm sprayed my apartment and I was left with a sense of relief that my apartment was safe again. Now another two people still could not find the little buggers. At 4:30 I had my sofa removed to take no chances and then had to run and get another mattress cover and pillow covers. I was excited to think I had control again. I picked up some laundry that had my sheets and went to go buy new pillows and a blanket. I got home and when I was working in my apartment was wearing the same dirty clothing, I was so excited to take a shower. I cleared all the trash bags out of my bathroom. I had been advised to put them in there. Since that area was deemed safe and it would be easy to spray/freeze the rest of the apartment. By the time I moved about 15 trash bags into my living room…there on the bottom of the tub I found them, TWO LIVING BED BUGS! They really did exist in my apartment. I almost lost it, but called Roberta, my bed bug fairy godmother. Not good, that the bug had moved from my living space into the bathroom which was considered a safe zone. She informed all the clothing would have to be re-washed and packaged. At this point I had a meltdown, I was exhausted in pain, overwhelmed, and the thought of doing it all over again was too much. It is funny when I first met Roberta she said I could call her whenever I needed something or had a question, I didn’t think I was going to be that person who called at 930pm on a Friday night, but I was. It was another night in a hotel…
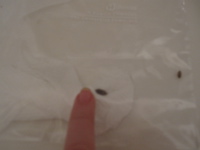
Two Bugs

Day 13- I decided forget about doing my laundry again, I couldn’t handle it and just sent it all out to be done. Something I wish I had just done in the first place. I was just having such a hard time wrapping my head around it since I had just brought all of my dry cleaning to the cleaners and that cost was overwhelming. I decided I would not stay in my apartment over the weekend and stayed with a friend.

Day 14- No Change

Day 15- they came again to my apartment to spray my bathroom. I thought it might be over. I was bitten that night

Day 16- was up all night and was bitten again.

Day 17- Went to Doctor because my shoulder was aggravated and became infected from carrying so many trash bags back and forth from the laundry mat. Pretty much passed out at the doctor’s office just overwhelmed by everything.  I went on antibiotics. Again moved out of my apartment and had another meltdown.

Day 18- No Change

Day 19- Moved all dry cleaning into a storage unit. I did not want to take a chance of taking anything into my apartment.  I am really excited to now have two storage units in NYC. Thank you Manhattan Mini Storage.

Day 20- Slept again in my apartment did not get bitten.

Day 21- Don’t think I was bitten previous bites super itchy and slept with TV and Lights on.

Now I am waiting for day 24 when they come again to freeze/spray. I figure, I will not unpack until December it is now November 3rd and I will always have that thought will they come back and are they really all gone. Maybe next Halloween I will go as a bed bug victim  but this year it was too close to home.

Sep 032009
 

Pesto Mashed Potatoes

This week I had the unpleasant experience of having my wisdom teeth taken out. I know, I am a little late since I think the average age of taking them out when they are 18 not 28. For the month prior I was teething which now I completely understand what toddlers are going through and have a new perspective. Now that I had to revert to eating mushy foods, I made in advance pre-surgery mashed potatoes. In true fashion I had to mess around with them a little and added some fresh pesto; I had gotten some basil at the Farmer’s market last weekend. Now I do love traditional mashed potatoes but this definitely was a fun twist to them and something I would enjoy every so often.

Â

Pesto

½ Cup Grated Parmesan Cheese

2 Cups of Fresh Basil Leaves

1/3 Cup of Toasted Pine Nuts

½ Cup of Olive Oil

1 tablespoon of Lemon Juice and 1-2 Teaspoons of Lemon Zest

I used my blender but a food processor would be better. Pulse together Basil and Pine Nuts (I chopped both before placing them into the blender) followed by Olive Oil, Parmesan Cheese, and Lemon Juice + Zest blend all ingredients together until smooth and looks like green pulp if it is too think add a little extra Olive Oil.

Mashed Potatoes

3 Russet Potatoes

½ Cup of Skim Milk

2 Tablespoons of Butter

Salt and Pepper

Peel the Potatoes and boil them until they are soft (a fork can easily puncture through). Remove potatoes from heat and water and place in a separate bowl. In a saucepan heat milk and butter once butter has melted add to potatoes and with a hand mixer whip the potatoes until fluffy and smooth. At this point add about ½ of the prepared pesto to start add more depending on how strong of a pesto taste desired.